
Tuesday, 27 December 2011
Teaser for Final Film (made with after effects)
Here is a spoof advertisement for The Machine that is in the story for my final film. I made it as part of the Adobe After Effects Uni Project. This project taught me the basics of After Effects and so I will hopefully be able to use this knowledge in my final film.
Saturday, 3 December 2011
Final Character Designs
I have finally finalised my character design.


This is the hero of the story I will call him John. He is going to propose to his girlfriend but does not think she will say yes. To help me stylise my designs I looked at 'Cloudy With a Chance of Meatballs' which helped he simplify my designs.

This is his Girlfriend. She will only appear as a photograph. If I have time I will sculpt he head or either collaborate or just use a drawing of her.

This is The Mechanic who lives in the cave in the centre of the world. He guards and takes care of the coin operated machine that rotates the earth. I hope that he will move quite oddly to emphasise his eternal nature.

This is the design for the trees on the surface of the world and the old wishing well where John makes a wish that his girlfriend will say yes when he proposes.

This is the rough design for the machine but, I will have to change it as I have changed my story slightly.
I now plan to make an animatic to time out the changes I have made to the story.
Friday, 4 November 2011
Character Development and Sculpting Practice
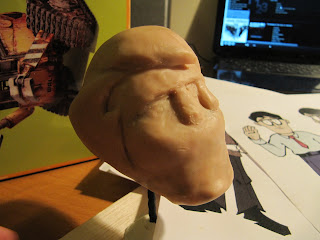
I attempted to develop my character designs more this week. To do this I practiced my sculpting with plasticine.

This is the sculpt I did last week but I pushed the head further down to stylize the proportions so that he would look more otherworldly.

I attempted to sculpt the Man's head but was not happy with the results. I will have to develop this character some more I think.

I also attempted to sculpt a girls face to help me design the Girlfriend. It may not look female but gave me a good practice at sculpting heads and an idea of the difference between male and female faces.
 Here are my character designs so far for the two main characters.
I hope to collaborate with some people to help me design these characters as I know design is not my strong point.

This is the sculpt I did last week but I pushed the head further down to stylize the proportions so that he would look more otherworldly.

I attempted to sculpt the Man's head but was not happy with the results. I will have to develop this character some more I think.

I also attempted to sculpt a girls face to help me design the Girlfriend. It may not look female but gave me a good practice at sculpting heads and an idea of the difference between male and female faces.

I hope to collaborate with some people to help me design these characters as I know design is not my strong point.
Friday, 28 October 2011


Saturday, 22 October 2011
Film Idea...'To The Heart of The Matter'
On a world that is turned by a machine. One man wants to win a girls heart.
Monday, 17 October 2011
Lip-Sync
This is my final animation for my Uni Lip-Sync and face acting project.
The character and the mouths are made from plasticine. The eyes are painted beads. Here is a picture of the mouths and eyelids.

I am very happy with my Lip-Sync, but I think the facial acting is a bit basic.
Friday, 14 October 2011
Testing, Testing, 1, 2, 3
This is a some quick animation tests for a University Mime Project.
The character is waiting for his date and think he sees her in the distance but its not her. He then gets embarrassed and depressed until his date arrives.
I was happy with some of the animation in these tests. I tried various ideas so it is a bit choppy.
The character is made from an armature (padded out with balsa wood), wire hands (padded out with funky foam), bead eyes with plasticine eyelids and cardboard mouths.
Monday, 20 June 2011
Saturday, 14 May 2011
Making My Puppets Continued...


I then painted the heads and made some funky foam necks.


I then made the teachers hat from funky foam covered in sock material and his mustache and eyebrows made from funky foam. I put wire in the mustache to make it animatable. I also made glasses for the schoolboy from wire, funky foam and the back of googly eyes for the white part.


 I then began to make clothes by measuring the puppets, making patterns from paper and then cutting the cloth to size. I sewed the main seems together and glued the edges.


I finished the clothes of with collars, ties, buttons and belts.


I made shoes for the school boy from funky foam and using the same method, I used card for the teachers shoes as he will not be moving much.

I sculpted mouths for the teacher from Plasticine and made mouths for the school boy from card and funky foam.


I finished the puppets off with Milliput eyes painted black. I also made Plasticine eyelids for the teacher and one set of angry eye lids for the school boy. I made a simple background to bring the piece together which I think works well.
Friday, 13 May 2011
Making My Puppets


Subscribe to:
Posts (Atom)